How to interact with lab resources
How to SSH into Wallace/Gromit
The process for ssh’ing into Wallace or Gromit is very similar between Mac/Windows users.
SSH on Mac
- Open up the Terminal application; you can find this by typing <command+space> and searching for Terminal, which should have an icon with
>_in the upper-right corner. Unless you’re using WashU wifi (wusm-secure), you’ll need to be VPN’ed into WashU’s network.
- Open up the Terminal application; you can find this by typing <command+space> and searching for Terminal, which should have an icon with
To SSH into Wallace or Gromit, run one of these commands below:
ssh <your-NIL-username>@wallace.neuroimage.wustl.edu -Y
ssh <your-NIL-username>@gromit.neuroimage.wustl.edu -Y
You should then be prompted to enter your password. Type it in then press
<Enter>.
Warning
There are no characters that will appear as you type in your password, so keep that in mind! If you think you made a typo, simply holding the <Backspace> key until you think all the characters are erased and try typing it in again.
SSH on Windows
The same instructions above, but perform them in either the Windows commmand prompt or Windows Powershell.
How to mount the Sylvester drive
Mount network drive on Mac
Ensure you are on WashU wifi, or are VPN’ed into their network.
Open the Finder application. At the top of your screen, click Go -> Connect To Server (near the bottom).
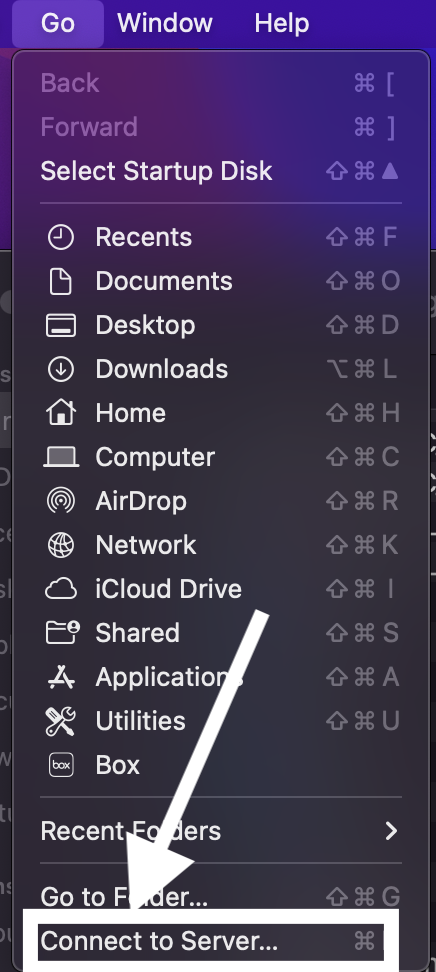
Type in the following IP address, above the section that says “Favorite Servers”:
smb://neuroimage.wustl.edu/nil/sylvester, then click “Connect”.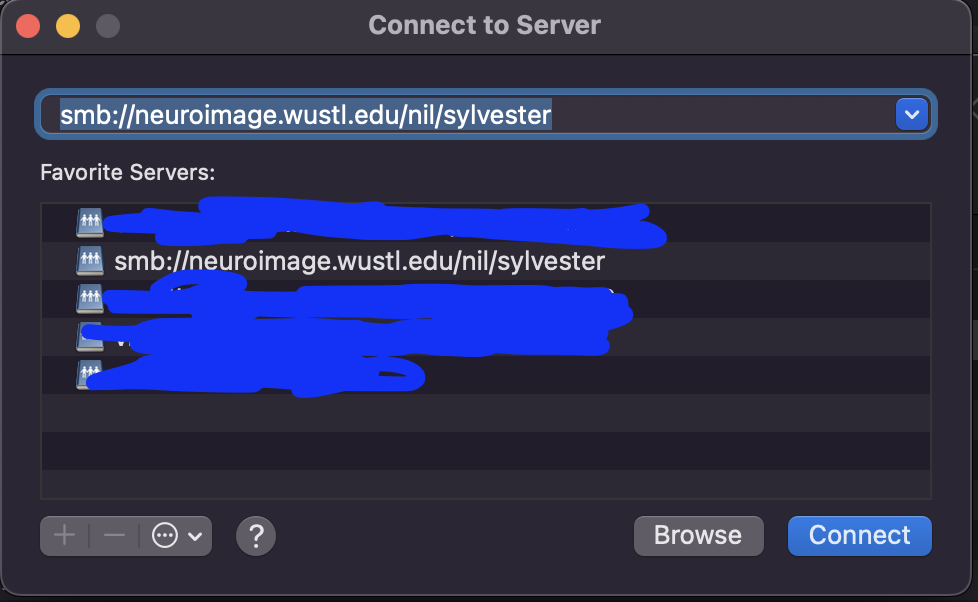
When prompted for your username and password, use your NIL username/password (NOT your Wustl key!)
When prompted to “Select the volumes you want to mount”, choose “sylvester”.
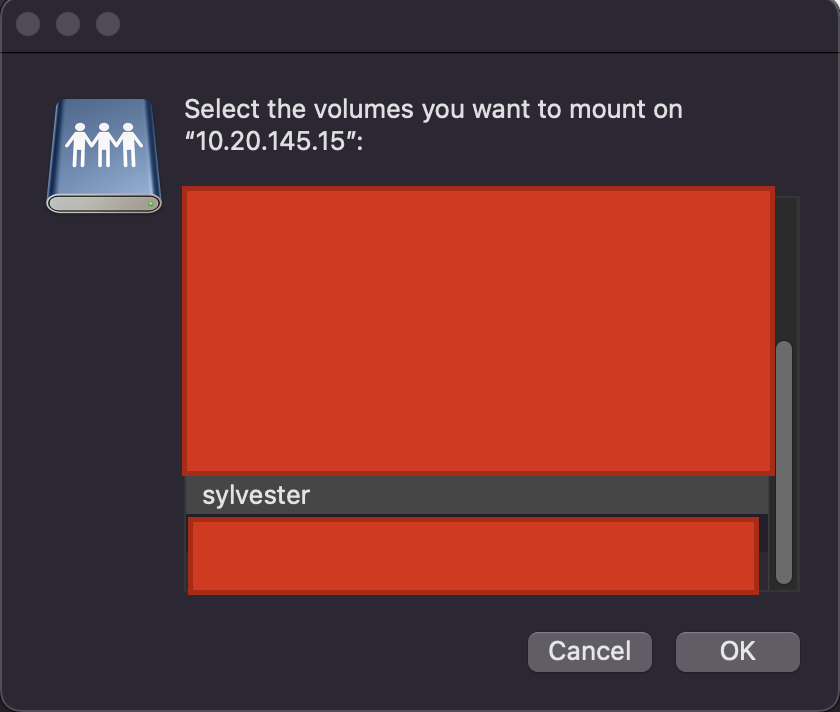
You should now be able to access the Sylvester drive via Finder, it will appear in the sidebar under the IP address you entered earlier.
Mount network drive on Windows
Ensure you are on WashU wifi, or are VPN’ed into their network.
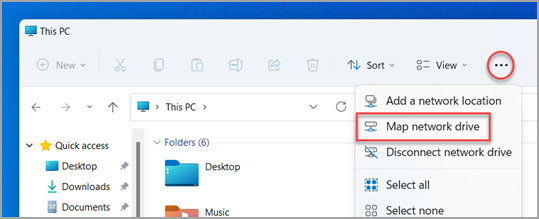
Open the File Explorer.
Select This PC from the left pane. Then, on the File Explorer ribbon, select “More …” > “Map network drive”.
Specify this path to the Sylvester drive:
\\neuroimage.wustl.edu\nilWhen prompted for your username, enter
neuroimage\<your-NIL-username>, and use your NIL password for your password.
Configuring Bash
When using SSH, a default .bashrc file is provided at the following path: /data/sylvester/data1/LabOrientation/template_bashrc. This file will configure Bash to include all the environment variables needed to use software on the system. To use this, you’ll need to copy this over into your home directory (not your directory at /data/sylvester/data1/users!), which can be done with this command:
cp /data/sylvester/data1/LabOrientation/template_bashrc ~/.bashrc
Hint
The ~ directory is shorthand for your Unix home directory at /home/usr/<your-NIL-username>/.
Desktop access over VNC
Both Wallace and Gromit can be accessed via the Virtual Network Computing (VNC) protocol, which allow for a user-friendly desktop experience when running programs or accessing files on the server. Below are different procedures to do this on both MacOS and Windows.
Start/restart a VNC server using SSH
If you’re starting a VNC server for the first time, or need to restart one (e.g. after a server reboot), follow these steps below:
First, ssh into your preferred server.
Run the following command, which will start a new VNC server:
/opt/TurboVNC/bin/vncserver -geometry 1920x1080
Note
1920x1080 refers to the pixel dimensions of the VNC window. If you have a smaller screen, adjust this option to fit the resolution of your screen.
(FIRST-TIME USERS ONLY) The program will prompt you to create a password if this is your first time logging on, so simply type in a new password when prompted, and hit Enter.
Warning
There are no characters that will appear as you type in your password, so keep that in mind! If you think you made a typo, simply holding the <Backspace> key until you think all the characters are erased and try typing it in again.
If there are any other prompts you receive, simply press <Enter> or type in the default option that appears.
You should now see some output similar to this:
Desktop 'TurboVNC: gromit:X (<your-nil-username>)' started on display gromit:X

Starting applications specified in /opt/TurboVNC/bin/xstartup.turbovnc
Log file is /home/usr/<your-nil-username>/.vnc/gromit:X.log
The X placeholder here will be either a 1- or 2-digit number, which will be part of the port number used when accessing the VNC server.
Hint
This command can also be used to view the status of any VNC servers you have running. To list all currently-registered servers, run the command /opt/TurboVNC/bin/vncserver -list. If a server is not responding or needs to be killed for whatever reason, run /opt/TurboVNC/bin/vncserver -kill :X, with X being a placeholder for the 1- or 2-digit server ID number (don’t forget to add the colon before this number!).
VNC on MacOS
MacOS has the ability to connect over VNC natively, without the need for downloading external software.
Open Finder -> Go -> Connect to Server (this is the same window that appears when mounting the network drive)
Depending on if you’re connecting to Wallace or Gromit (I’ll use Gromit in this example), enter
vnc://gromit.neuroimage.wustl.edu:59XXinto the top bar that appears. The 59 will always come before the last two characters here, XX, which should be replaced with the ID number of your VNC server. If the ID number is 1 digit, make it 2 digits by prepending a 0 before (for example, if your server ID is 6, you would enter 5906 after the colon). If the ID is 2 digits, enter it as it appears (ID number 15 would be 5915 after the colon).Click Connect.
When prompted for a password, enter in the password you created when starting a VNC server for the first time. Keep in mind that this password gets truncated to 8 characters, so only enter the first 8 of your password if it’s longer than that.
VNC on Windows
(Joey) At the time of making these docs, I don’t have access to a Windows computer for creating detailed steps as above in the MacOS case, but they’re very similar.
We use a software called TigerVNC on our Windows computers to access VNC – please contact NIL systems at nil-systems@npg.wustl.edu for questions about installing this on your system.
The steps for connecting with TigerVNC here are largely the same as the MacOS instructions, as you’ll need to enter the same vnc://... address and port number, and enter the same password as above. More detailed Windows instructions will be added soon!